Sunday, January 24, 2010

Low Fat vanilla cupcakes w/icing :)

This is honestly the first dessert I have made completely homemade!

They may not be too pretty but they sure were good!

I changed the icing a tad but it still turned out pretty well, I was impressed!

I also for the first time used the silicone individual cupcake holders
and I liked them however I do wish the paper cups would have fit better.

Heres the recipes I used:

Low Fat Vanilla Cupcakes
Makes 12 cupcakes.


Ingredients
• 2 cups white flour
• 1/2 cup Splenda
• 1 tsp baking powder
• 1/2 tsp baking soda
• ½ tsp salt
• 1/2 cup skim milk
• 1/4 cup vegetable oil
• 1/4 cup unsweetened applesauce
• 1 egg
• 2 egg whites
• 1 tsp vanilla extract

Instructions

Preheat oven to 350 degrees Fahrenheit. Mix dry and wet ingredients separately, then stir just until combined. Line 12-cup muffin tin with cupcake papers and divide batter evenly. Bake 25 minutes or until toothpick inserted in the center of one cupcake comes out clean.

Butter Creamy Icing

Ingredients
•1/3 cup butter
•1/4 teaspoon salt
•1 teaspoon vanilla extract
•3 cups sifted confectioners sugar
•3 to 4 tablespoons milk

Instructions:
Warm butter then mix with salt and vanilla, beating until light and fluffy.  Add sugar gradually, beating continuously.  Add 3 tablespoons milk beating until smooth. If not the consistency you desire add more sugar to make thicker or milk to make thinner.

For your enjoyment this is the lunch I made as well!

Chicken Parm, whole wheat noodles with Fociacca Bread! YUMMMMMM

Monday, January 11, 2010

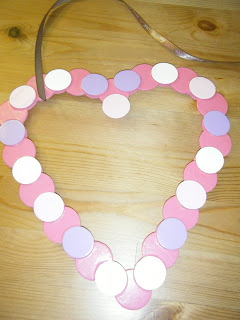
Wood Heart Wreath

Valentine's day is coming up quickly!
 I seen a similar version of this at Kohls for $20 and I knew it could be made for wayyyy less! I bought all the items for this for under $7.
 I started out with just plain wood disc in two different sizes. Hot Glue. Various Valentine's Day themed paint. Ribbon. 2 Staples. Other things could be substituded as desired.


12 Steps to Make:
1st- Make a heart on a piece of paper approximately the size you want my wreath to be.
2nd- Layout the disc in the order desired on the heart on the paper.
3rd- Begin gluing them together (be careful not to burn your fingers with the hot glue)
4th- (Optional) If you want a layered look like in the picture double up every other disc.
5th- Let glue set for about 10 minutes or so.
6th- Begin painting with the desired colors be sure if adding several layers of paint to let it sit to dry between layers (see paint label).
7th- (Optional) If wreath is going to be hung outdoors consider adding a protectant layer.
8th- Let dry completely.
9th- Cut ribbon to desired length.
10th- Tie a knot in each end of ribbon.
11th- Staple to back of wreath in desired location (keep in mind to staple in the same location on each side of the wreath so it will hang straight if that is desired)
12th- Enjoy your new handmade valentine's wreath!

I will be adding a sweethearts design as the finishing step to mine... will post pics of it once I find the ones I want to use! :)

Thursday, January 7, 2010

Knitting


I have been knitting a lot lately.
Making scarves, hats and afgans. I don't have as much time to do the things I enjoy so I am always looking for an easier and quicker way. I bought a knifty knitter kit at Wally World and its like the possiblities are endless now. I love using it and it makes creating new things much easier!

I also have been working on a valentine'd hanger for our front door, I'll post the instructions and pics within a few days :)